
Z offset
Z offset sets how far the nozzle stays from the plate on the first layer. A higher value leaves more gap and less squish, so parts release more easily; too high, and the first layer does not hold.
Where to find it
Section titled “Where to find it”In the FarmLoop app, in the Detachment tuning step: Tuning Parameters, then Z Offset, next to Heated Bed Temperature (on a phone, right after it).
- Range:
-0.10to+0.10 mm, in0.02 mmsteps, with a slider and a box. - Plans: Pro and Business.
- The number means something different on Bambu Lab printers and on the others. See the two sections below.
Gap and squish
Section titled “Gap and squish”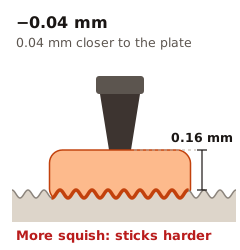
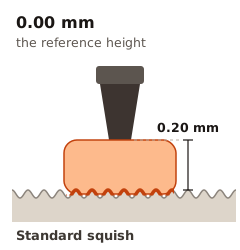
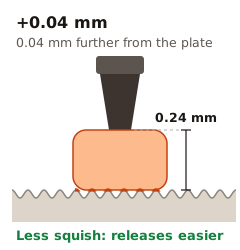
Compared with 0.00, a value of -0.04 brings the nozzle 0.04 mm closer to the plate, and +0.04 moves it 0.04 mm away. With a 0.20 mm first layer that is a gap of 0.16, 0.20 or 0.24 mm.
- More positive: more gap, less squish, a weaker bond and an easier release.
- More negative: less gap, more squish, the part sticks harder, and the nozzle is more likely to mark the plate.
- Too high: the lines no longer bond well to the plate or to each other. The first layer looks ridged or has gaps, and parts can lift or come loose during the print.
Bambu Lab printers: the number is the Z offset itself
Section titled “Bambu Lab printers: the number is the Z offset itself”Bambu Studio writes a Z offset for the textured PEI plate into the file, in its G29.1 Z line. When you load a file, the Z Offset box shows that value. The number you set replaces it.
Bambu’s stock value is not the same on every printer, so the same number gives a different first layer:
| Printer | Bambu stock value (textured plate) | FarmLoop range |
|---|---|---|
| P1P, P1S, X1C | -0.04 mm | 0.00 to +0.04 mm |
| A1, A1 mini | -0.02 mm | +0.02 to +0.06 mm |
| X2D, P2S | +0.02 mm | +0.06 to +0.10 mm |
Start in the middle of the range. On an X2D or P2S, +0.02 is the stock value and changes nothing. On printers not in the table, start from the value the box shows when you load the file: that is what Bambu Studio sliced in. The same table is in Parts won’t detach.
Elegoo, Prusa, Snapmaker and Flashforge: the number raises the print
Section titled “Elegoo, Prusa, Snapmaker and Flashforge: the number raises the print”These files have no Z offset line. The printer keeps its own Z offset: Prusa per print sheet, the others in the printer’s settings. The app’s number is added on top of it.
0prints exactly as sliced. It is where every printer model starts.- A positive number raises the whole print. At
+0.04the first layer moves from Z0.2 to Z0.24, and every layer above moves with it. - Only the print moves. The purge line or prime blob, the Stage 2 switch presses, the push and the sweep keep their heights.
- Try
+0.02 mmfirst, up to+0.04 mm. - The app remembers the value for each printer model in your browser, so a Bambu value never carries over.
- A negative value that would put the first layer at or below the bed is refused.
This covers the Elegoo Centauri Carbon and Centauri Carbon 2, the Prusa Core One and XL / XL+, the Snapmaker U1 and the Flashforge AD5X.
How to tune it
Section titled “How to tune it”-
Start in the middle of the range for your Bambu Lab printer, or at
+0.02on the other printers. -
Process the file and print one loop. Watch the first layer: the lines should still touch the plate and each other.
-
Check the release after the cooldown.
-
Raise it
0.02 mmat a time while parts still stick. Go back down0.02 mmif the first layer stops holding.
Over the Processing API
Section titled “Over the Processing API”Business accounts send zOffset. On Bambu Lab printers it replaces the file’s value; on the other printers it raises the print. See Processing API: settings.