
Trigger calibration
Trigger calibration presses the Stage 2 switch up to 3 mm deeper, for printers that stop just short of it so Stage 2 never starts. Start small and watch the first run: the press goes past the printer’s usual highest point.
When you need it
Section titled “When you need it”Stage 2 starts when the printer presses the FarmLoop kit’s switch. On the Bambu Lab P, X and H series and on the Elegoo, Prusa and Snapmaker printers the bed moves down onto the switch. On the A1 and A1 mini the gantry rises into the trigger at the top. If the kit sits a fraction low, or the plate is a little thinner, the printer can stop just short:
- The print finishes and the bed goes down to the switch, but there is no click.
- The door does not open and the bender does not run: Stage 2 silently does nothing.
- It happens on every print, not once in a while.
Check first that the switch sits flush in its holder: see Stage 2 activation issues. A loose switch moves during the print, and pressing deeper does not fix that.
Where to find it
Section titled “Where to find it”In the FarmLoop app, in the Detachment tuning step: Tuning Parameters, then Trigger Calibration, under Heated Bed Temperature. On a phone it comes after Z Offset.
- Plans: Pro and Business.
- Stage 2 only: the setting shows while Stage 2 is switched on. Stage 1 bends the plate against a bar and has no switch.
- Out of beta since FarmLoop 2.8: no Beta features switch needed.
What it changes
Section titled “What it changes”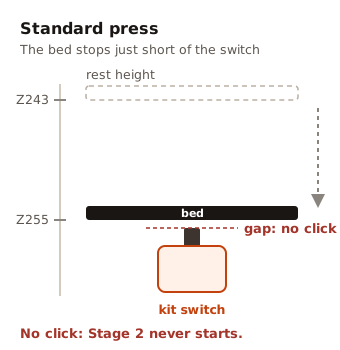
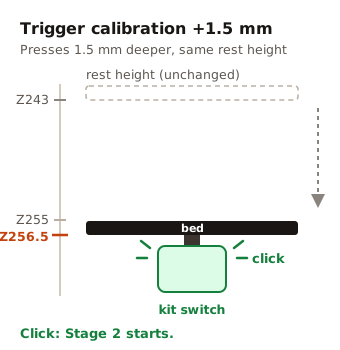
- Every press of the switch goes deeper by the amount you set, from the first trigger to the last press that closes the door.
- The rest height stays where it is, so the stroke gets longer instead of the whole movement shifting. On a P1S at
1.5 mm: Z243, down to Z256.5, back to Z243, instead of Z243, Z255, Z243. - Nothing else changes: not the rest height, not the Stage 1 bending, not the sweep.
As soon as the value is above 0, the app shows the new press height under the slider, for example: “Presses to Z256.5 instead of Z255 on every trigger.”
Setting it
Section titled “Setting it”The setting goes from 0 to 3 mm in 0.5 mm steps. 0 leaves the press as it is.
-
Check the switch sits flush in its holder.
-
Set
0.5 mmin Trigger Calibration. -
Process the original sliced file again, not the
FL_S2_file you made before. -
Watch the first run. Stay at the printer when the print ends: you should hear the switch click and see the door open.
-
Raise it in
0.5 mmsteps only if the switch still does not click. The maximum is3 mm.
Press heights per printer
Section titled “Press heights per printer”| Printer | Standard press | At +3 mm |
|---|---|---|
| Bambu Lab P1P, P1S, P2S, X1C, X1E | Z255 | Z258 |
| Bambu Lab X2D | Z260 | Z263 |
| Bambu Lab H2S | Z340 | Z343 |
| Bambu Lab H2D, H2C | Z325 | Z328 |
| Bambu Lab A1 | Z256 | Z259 |
| Bambu Lab A1 mini | Z185 | Z188 |
| Elegoo Centauri Carbon, Centauri Carbon 2 | Z255 | Z258 |
| Prusa Core One | Z273 | Z276 |
| Prusa XL, XL+ | Z368 | Z371 |
| Snapmaker U1 | Z266 | Z269 |
The Flashforge AD5X has no Stage 2 kit, so it has no trigger calibration.
Over the Processing API
Section titled “Over the Processing API”Business accounts send the same setting as triggerCalibrationMm, from 0 to 3. On Stage 1 it is ignored and the response says so in X-FarmLoop-Warning. See Processing API: extra tuning tools.