Stage 2 activation issues, door or bender doesn't fire
If a print finishes and then nothing happens - the door stays shut, the bender doesn’t move, or only some of the triggers fire - work through the checks below in order. Each one narrows the problem down further: hardware first, then the trigger pipeline, then the file itself.
This applies to Stage 2 on P/X-series and H-series printers (the ones with the door kit). If you’re on Stage 2 A-series, the same logic applies but there’s no door step - substitute the limit-switch component test on the A-series verify page.
Symptoms
Section titled “Symptoms”After the print ends you see one of:
- The door doesn’t open and the printer just sits with the part on the plate
- The bender doesn’t run even though the door opens
- The fan doesn’t kick in during cooldown, so the bed never reaches the release threshold
- Some triggers fire but not others (for example door opens but bender never moves)
1. Long-press the door button to run the component test
Section titled “1. Long-press the door button to run the component test”On the printer, hold the outer door button (on the tilted foot, marked with the FarmLoop logo) for about 5 seconds to enter test mode. The board runs the full door → bender → fan sequence on demand, no print involved.
- All three fire correctly → the hardware is good. Move on to step 2, the problem is in the trigger pipeline or the file.
- Something doesn’t fire → before moving on, work through these in order:
- Check the plugs on the FarmBoard. Power the printer down, reseat every connector (actuator, limit switch, door, fan, AMS/power) and make sure each one is fully clicked in. Loose connectors during shipping or vibration are the single most common cause.
- Reflash the board with the latest firmware from the Firmware page. Bugs in earlier firmware can cause individual triggers to misfire even when the wiring is fine.
- Still failing? Walk through Verify installation, P/X series cable by cable to identify which connection is bad.
2. Send the activation test file for your printer
Section titled “2. Send the activation test file for your printer”The activation test file for your printer doesn’t print anything - it’s an empty G-code whose only job is to fire the FarmLoop triggers. This is the cleanest way to check that the triggers actually reach the board from a real print.
On a working setup with the door kit, you should see:
- Door closes (cooldown start)
- Door opens
- Fan turns on for the cooldown phase
- Bender bends
- Door closes again
If every trigger fires in sequence, the pipeline is working. Before moving on to step 3, do the limit-switch seating check just below.
If only some fire (for example door closes but the bender never moves), that’s a clear signal the failing trigger is the one to focus on. Compare against the component test in step 1 to confirm hardware vs. file.
If the activation test passes, check the limit-switch seating
Section titled “If the activation test passes, check the limit-switch seating”A common cause of “the component and activation tests work, but real prints sometimes miss a trigger” is a limit switch that isn’t fully seated in its holder. The switch body must sit flush in the slot - pressed all the way in, with no gap between the switch body and the holder. If it’s even slightly loose, vibrations and toolhead movement during a real print can shift it enough that the bender no longer reliably contacts it.
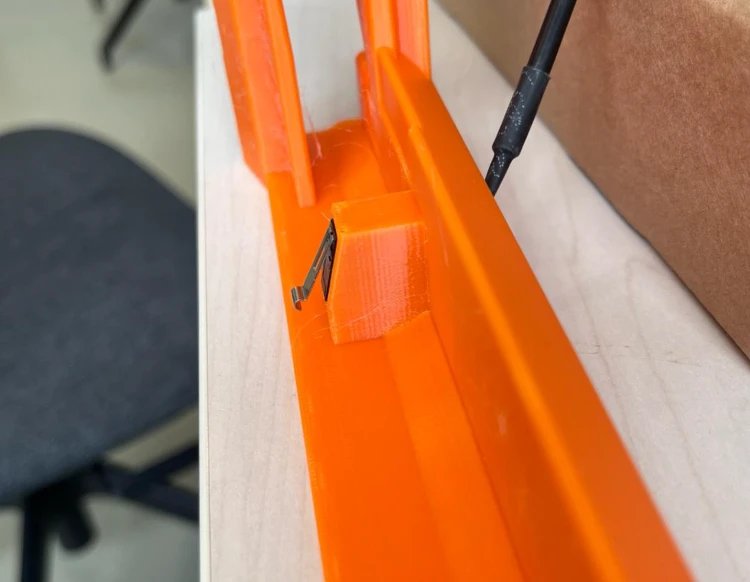
If the switch isn’t flush:
- Push it fully into the holder - a firm press down with your thumb is usually enough. The switch should bottom out in the slot.
- Reprint the holder with the newest revision if the slot is too loose or the switch won’t seat flush: download from the FarmLoop printable parts collection on MakerWorld. Newer revisions have tightened tolerances specifically to lock the switch in place.
3. Run the Benchy test
Section titled “3. Run the Benchy test”Send the Benchy test file for your printer. This is the same trigger sequence as step 2, but with an actual part printed first, so it exercises the full cooldown timing and the bender against a real plate-adhered part.
If the Benchy ejects cleanly, the system is healthy - your original failure was most likely with the file itself, which step 4 covers.
4. Check the file was processed through the FarmLoop app
Section titled “4. Check the file was processed through the FarmLoop app”This is the single most common cause of “the triggers didn’t fire on my own file”. The FarmLoop app injects the trigger G-code into your sliced file when you process it - if you skipped that step, or processed it for the wrong stage, the printer just runs a normal print with no eject at the end.
With the current FarmLoop app, a correctly-processed Stage 2 file is renamed with an FL_S2_ prefix. Look at the file you sent to the printer:
- Filename starts with
FL_S2_→ it was processed for Stage 2 correctly. - No
FL_S2_prefix (or it starts withFL_S1_) → it was never processed for Stage 2. Reprocess in the app: make sure Stage 2 is selected, click Add to Queue (or Process G-code), and use the newFL_S2_…file the app produces.
See Correct workflow for the full process.
Still not working
Section titled “Still not working”If all four checks pass and the system still won’t eject on your own files, open a support ticket and include:
- Printer model and FarmLoop firmware version (from the Firmware page)
- FarmLoop app version
- The
.3mforFL_S2_….gcode.3mffile that didn’t trigger - What happened at each of the four checks above (which step it stopped at)
We’ll take it from there.
Related
Section titled “Related”- Activation test print, the empty-trigger and Benchy files used in steps 2 and 3
- Verify installation, P/X series, full breakdown of the component test sequence
- Correct workflow, making sure the app produces an
FL_S2_…file before you print