
Bottom surface flow (beta)
Bottom surface flow puts a little less plastic into the first layer’s bottom surface, so parts grip the plate less and release more easily. Use it when parts still stick too hard after the cooldown. It is still in beta: switch on Beta features in the app footer to see it.
Where to find it
Section titled “Where to find it”- Switch on Beta features in the footer of the FarmLoop app.
- In the Detachment tuning step, go to Tuning Parameters. Bottom Surface Flow sits under Z Offset, with a BETA badge.
- Switch it on and set the target:
0.90to1.00, in0.01steps. It starts at0.97.
It works on Stage 1 and Stage 2, on every printer.
Why less plastic helps
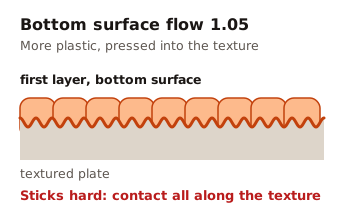
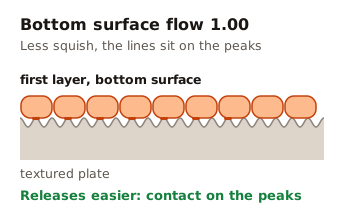
Section titled “Why less plastic helps”The bottom surface is the solid layer that sits on the plate. A few percent more plastic there presses more of it into the plate’s texture, and that is grip. Farms report that 1.05 sticks hard and 1.00 or a little below pops off after the cooldown.
What changes and what stays
Section titled “What changes and what stays”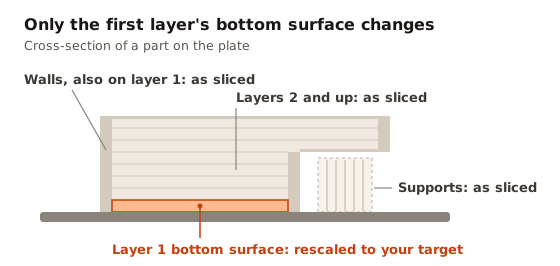
- Changed: the printing moves of the bottom surface on layer 1. Bambu Studio and OrcaSlicer mark them as “Bottom surface”, PrusaSlicer as “Solid infill” on the first layer.
- Unchanged: the walls, also on layer 1, the supports, every layer from layer 2 up, and the retractions and wipes.
- Every loop copy in the file gets the same change.
Which number your file starts from
Section titled “Which number your file starts from”| Slicer | Records the bottom surface flow? | What your target does | Example at 0.97 |
|---|---|---|---|
| OrcaSlicer, ElegooSlicer, Snapmaker Orca | Yes (bottom_solid_infill_flow_ratio) | Rescales from the sliced value to your target | Sliced at 1.05: 7.6% less plastic (×0.924) |
| Bambu Studio, PrusaSlicer | No, so the file counts as 1.00 | Works as a plain factor | 3% less plastic (×0.970) |
The app shows what it will do under the slider, for example: “Bambu Studio does not record a bottom surface flow, so the sliced file counts as 1.00. At 0.97 the bottom surface gets 3% less plastic (x0.970).”
An OrcaSlicer file sliced below your target gets more plastic, not less: sliced at 0.95, a target of 0.97 adds 2.1%.
How to tune it
Section titled “How to tune it”-
Start at
0.97and process the file. -
Print one loop and watch the first layer. It should still hold while the part prints.
-
Check the release after the cooldown.
-
Go lower in
0.01steps if parts still stick. On a textured plate stay closer to1.00: textured plates need more squish than smooth ones. -
Go back up if parts come loose during the print, or the bottom shows gaps between the lines.
Over the Processing API
Section titled “Over the Processing API”Business accounts send the target as bottomSurfaceFlow, from 0.90 to 1.00. See Processing API: extra tuning tools.