
Heated Bed Temperature
Heated Bed Temperature sets how warm the bed is while the part prints. A cooler bed makes a weaker first-layer bond, so the part releases more easily after the cooldown; too cool, and the first layer lifts or the corners warp.
Where to find it
Section titled “Where to find it”In the FarmLoop app, in the Detachment tuning step: Tuning Parameters, then Heated Bed Temperature, the first setting in the panel.
- Range:
25to75 °C, in1 °Csteps, with a slider and a box. - Starting value: when you load a file, the box shows the bed temperature from the file, the one your slicer set for the first layer.
- Plans: Pro and Business. Lite has no Tuning Parameters and prints at the file’s bed temperature.
What FarmLoop changes in the file
Section titled “What FarmLoop changes in the file”- Every command that heats the bed gets your value:
M140andM190with a temperature above 0. That covers the first layer, the later layers and the heat-up at the start of every loop. If your slicer uses one temperature for the first layer and another for the rest, both become this value. - Not changed: the “bed off” command at the end (
M140 S0), and the cooldown wait that holds the part until the Cooldown Temperature.
Two bed temperatures, two jobs
Section titled “Two bed temperatures, two jobs”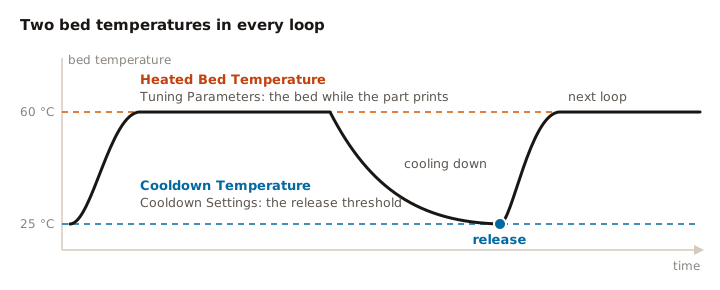
| Heated Bed Temperature | Cooldown Temperature | |
|---|---|---|
| Where in the app | Tuning Parameters | Cooldown Settings |
| When it counts | While the part prints | After the print |
| What it sets | How warm the bed is, and so how strongly the first layer bonds | How far the bed cools before the part is released |
| Lower it when | Parts stick hard even after a full cooldown | Parts are still warm and holding when the release starts |
The Cooldown Temperature starts at 25 °C. For more on it, see Parts won’t detach: lower the cooldown temperature. If the release fires at a different temperature than the one you set, see Temperature mismatch.
How it changes detachment
Section titled “How it changes detachment”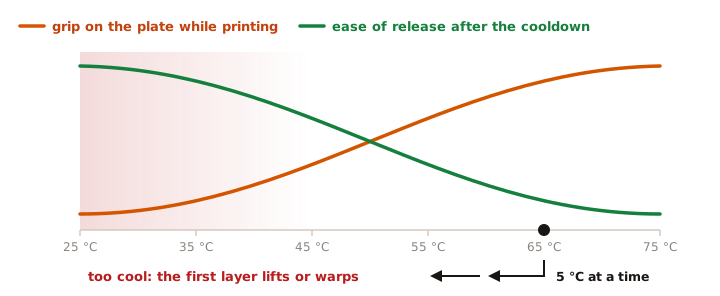
- Warmer: the first layer bonds more firmly with the plate. Good for holding the part while it prints, harder to release.
- Cooler: a weaker bond and an easier release after the cooldown.
- Too cool: the first layer does not hold while printing. Lines lift, corners warp, and tall or narrow parts can come loose before the print ends.
-
Start from the file’s value. It is in the box when you load the file.
-
Lower it by
5 °Cand process the file. -
Watch the first layer of the first loop: the lines should lie flat and the corners stay down.
-
Check the release after the cooldown.
-
Repeat until the part releases cleanly. If the first layer lifts or the corners warp, go back up
5 °C.
Over the Processing API
Section titled “Over the Processing API”Business accounts send heatedBedTemperature. Left out, the file’s own bed temperature is used. See Processing API: settings.