FarmLoop firmware
Firmware runs on the FarmBoard control board inside your FarmLoop module. It handles the bending routine, limit-switch gestures, door control (P/X and H series), and MQTT communication with your Bambu printer.
There are two ways to update:
- USB-C flash from your browser (recommended for major versions), plug the controller board into your computer with a USB-C cable and click the button below. Works in Chrome and Edge. Erases and re-flashes the full firmware.
- OTA update via the board’s web page (for small updates), enter OTA mode on the running board, open its web UI, and upload the
_OTA.binfile. No cable needed.
If you’re not sure which firmware you need, check the printer model and the FarmBoard revision printed on your control board - each FarmBoard generation has its own firmware binary and they cannot be swapped.
Current firmware
Section titled “Current firmware”Bambu A Series
Bambu A1 Mini, A1
Release notes
- Digital Mode (Full MQTT) released: all triggers run automatically from the print’s G-code markers.
- Requires G-code processed with the FarmLoop App 2.71 or higher.
Download OTA .bin · FB1
Download OTA .bin · FB2
Bambu P/X Series
Bambu P1P, P1S, P2S, X1C, X2D
Release notes
- Digital Mode (Full MQTT) released: all triggers run automatically from the print’s G-code markers.
- Multi-loop prints fixed: in some cases the first loop ran fine but the following loops did not trigger.
- Serial number entry is case-insensitive - lowercase input is corrected automatically.
Bambu H Series
Bambu H2S, H2D, H2C
Release notes
- Digital Mode (Full MQTT) released: all triggers run automatically from the print’s G-code markers.
- Multi-loop prints fixed: in some cases the first loop ran fine but the following loops did not trigger.
- Serial number entry is case-insensitive - lowercase input is corrected automatically.
FarmBoard 3 needs to be powered via the AMS plug before USB-C flashing - the USB-C port alone doesn’t power the chip.
Download OTA .bin · FB3
Download OTA .bin · FB2
Previous versions
Section titled “Previous versions”Older firmware is published here so you can roll back if a newer release misbehaves on your setup. Either USB-C flash with the button on the card, or enter OTA mode on the running board and upload the _OTA.bin via its Firmware Update page.
- A series: roll back from v1.50 to v1.40, or all the way to the v1.30 shipping firmware.
- P/X series: roll back from v2.94 to v2.92. (v2.93 is intentionally not offered - it has known multi-loop trigger bugs that v2.94 fixes.)
- H series: roll back from v3.1 to v3.00.
Bambu A Series
Bambu A1 Mini, A1
Release notes
- Startup procedure that tests actuators and fan
- Manual triggering only (long-press / triple-tap) - no MQTT
Download OTA .bin · FB1
Download OTA .bin · FB2
Bambu A Series
Bambu A1 Mini, A1
Release notes
- Original shipping firmware, most A-series boards left the factory with this build
- v1.30 itself has no OTA web page, to come back up to v1.40 (or later) you must USB-C flash
- The “Download OTA .bin” button below is only for going to v1.30, by uploading it from a board already on v1.40
Bambu P/X Series
Bambu P1P, P1S, P2S, X1C
Release notes
- Fixed OTA Wi-Fi bug that froze the PCB after setting Wi-Fi credentials
- Improved trigger reliability and stability
- MQTT Trigger option added (enable / disable via OTA page)
Bambu H Series
Bambu H2S, H2D, H2C
Release notes
- Previous H-series release - MQTT triggering armed per cycle via the 4-tap reset
FarmBoard 3 needs to be powered via the AMS plug before USB-C flashing - the USB-C port alone doesn’t power the chip.
Download OTA .bin · FB3
Download OTA .bin · FB2
How to USB-C flash
Section titled “How to USB-C flash”- Power off your printer and unplug the controller board from AMS / 5V power.
- Plug a USB-C cable from your computer into the controller board’s USB-C port.
- Click “USB-C flash” in the card above for your printer family.
- Select the serial port Chrome / Edge shows for the board. It’s usually named
USB-SERIAL,CH340,CP210x, orUSB JTAG/serial debug unit. - Click Install. The browser erases the chip and writes the new firmware. This takes 30-60 seconds.
- When done, unplug USB-C, reconnect AMS / 5V power, and verify the LED startup sequence (see below).
How to OTA update
Section titled “How to OTA update”- Download the
_OTA.binfile for your printer family (the “Download OTA .bin” button in the cards above). - Enter OTA mode and open the board’s web page - 5 quick taps on the LIMIT SWITCH (A series) or the DOOR BUTTON (P/X and H series), join the
FarmLoopWi-Fi, then openfarmloop.local. - Scroll to the Firmware Update card, pick the
_OTA.binfile, and click Upload. - The board reboots automatically after a successful upload.
Getting logs from the FarmBoard
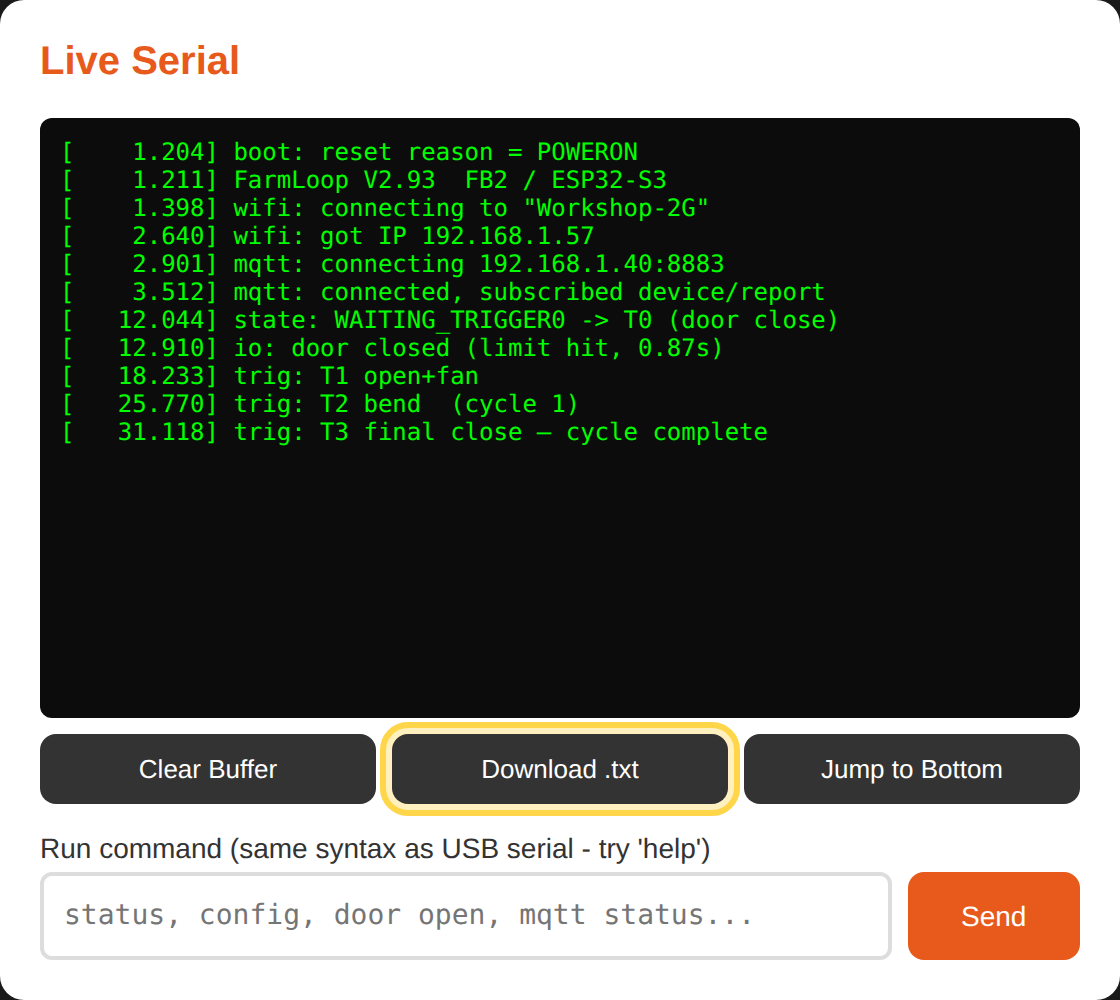
Section titled “Getting logs from the FarmBoard”If you’re reporting a firmware problem, the board’s log is the single most useful thing you can send us - it captures boot reasons, Wi-Fi/MQTT status, and the full trigger sequence. The log lives on the same web page you use for OTA updates.
- Enter OTA mode and open the board’s web page - 5 quick taps on the LIMIT SWITCH (A series) or the DOOR BUTTON (P/X and H series), join the
FarmLoopWi-Fi network (password3D-Farmers), then openfarmloop.local(or192.168.4.1). - Scroll to the Live Serial card.
- Click Download .txt (highlighted below). Your browser saves a
farmloop_log.txtfile. - Attach that file to a support ticket under Technical issue, along with the
.gcode.3mfof any print that triggered the problem.
Verifying the update
Section titled “Verifying the update”After reboot, the LED shows the startup sequence:
- A series: 3 quick blinks → idle
- P/X series and H series: 3 quick blinks → 5 slow (Wi-Fi) → 10 fast (MQTT), all three means the board is fully connected to the printer.
If the LED doesn’t follow this pattern, see the LED-signals reference in your printer’s assembly guide:
- Bambu A1 Mini, Operation
- Bambu A1, Operation
- Bambu P/X series, LED signals
- Bambu H2S, H2D, H2C - H-series shares the P/X LED reference.
Troubleshooting
Section titled “Troubleshooting”Browser shows “No device found” when I click Install. Try a different USB-C cable, some cables are power-only and don’t carry data. Also make sure the controller board’s USB-C port is the one you plugged into (not the printer’s USB port).
Flash fails halfway through. Unplug, wait 10 seconds, re-plug, and retry. If it still fails, hold the board’s BOOT button while plugging in USB-C to force bootloader mode, then release once connected.
Flashing succeeded but LED doesn’t blink the startup sequence. Power-cycle the board (unplug AMS / 5V power for 10 seconds). If still nothing, re-flash with the USB-C method, the OTA partition may have been corrupted.
Can I downgrade? Yes - every series has its previous release in the Previous versions section above (A: v1.40 / v1.30, P/X: v2.92, H: v3.00).