
Custom sweep control
Custom sweep control replaces the single push that clears the plate with several pushes, each with its own height, speed and coverage, so a plate with tall and short parts gets cleared in one loop. Use it when the standard push leaves short parts behind next to tall ones. Switch it on and change nothing, and you get the standard pushes and clearings.
Where to find it
Section titled “Where to find it”In the FarmLoop app, in the Detachment tuning step: open Advanced controls in the Detachment Mode card (click Show), then switch on Custom sweep control.
- Plans: Pro and Business. On Lite the card is greyed out and says “Pro only”.
- Stages and modes: Stage 1 and Stage 2, in push mode. Lift mode on the A1 and A1 mini moves the part differently and has no sweep control.
- Out of beta since FarmLoop 2.8: no Beta features switch needed.
Why one push height is not always enough
Section titled “Why one push height is not always enough”The standard push runs at one height: the tallest part on the plate minus 10 mm (minus 20 mm on the H2S, H2D and H2C), or 5 mm when the tallest part is 15 mm or lower (25 mm on the H2 printers). The Push Height box in Push Mode can override it, but it is still one number for the whole plate.
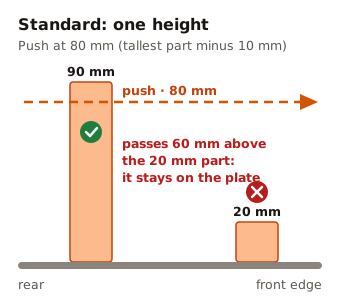
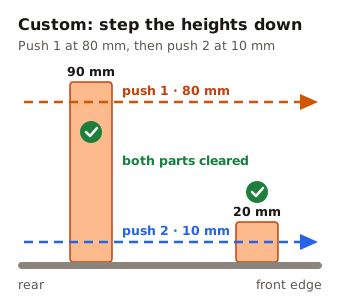
On a plate with a 90 mm part and a 20 mm part, the push runs at 80 mm. It clears the tall part and passes 60 mm above the short one.
How a routine is built
Section titled “How a routine is built”A routine is a list of pushes, followed by clearings. The pushes run in order, then the clearings.
- A pass is one out-and-back in one lane: to the rear edge, then forward to the front edge, where the parts drop off.
- A push is the first contact with the parts.
- A clearing is a follow-up rake that catches what the pushes left behind.
What you start with
Section titled “What you start with”When you switch the control on, it starts with the standard pushes and clearings:
| Stage | Coverage | Speed | Height |
|---|---|---|---|
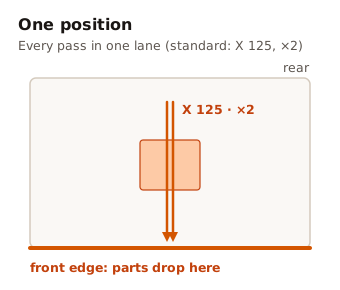
| Push | One position in the middle of the plate (X 125 on a P1S), 2 passes | Slow | The file’s push height |
| Clearing 1 | Whole plate | Slow | The file’s push height |
| Clearing 2 | Whole plate | Fast | The file’s push height |
Settings for each push and clearing
Section titled “Settings for each push and clearing”Every push and every clearing has its own card with three settings:
| Setting | Choices | Notes |
|---|---|---|
| Height | 0.5 mm up to the tallest part on the plate, in 0.5 mm steps | Leave it blank to use the file’s push height, shown in grey in the box. A sweep above the tallest part touches nothing, so that is the cap. When the file has no part height, the cap is the printer’s limit (table below). |
| Speed | Slow, Medium, Fast | 50, 100 and 200 mm/s (F3000, F6000, F12000), the speeds of the standard routine. |
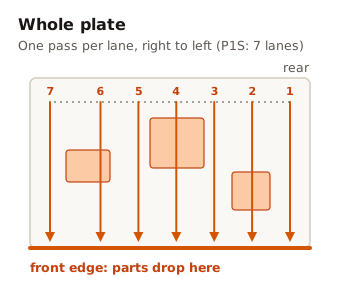
| Coverage | Whole plate, One position | Whole plate runs one pass in every lane of the printer’s standard spread. One position runs every pass in one lane: choose it with the X position slider, and set 1 to 10 passes. |
- Add push adds a push at half the height of the push above it. Up to 6 pushes.
- Add clearing adds a copy of the last clearing. Up to 4 clearings.
- The bin icon removes a push or a clearing. You can remove every clearing: the routine then ends after the pushes, and anything they do not reach stays on the plate.
What the head does
Section titled “What the head does”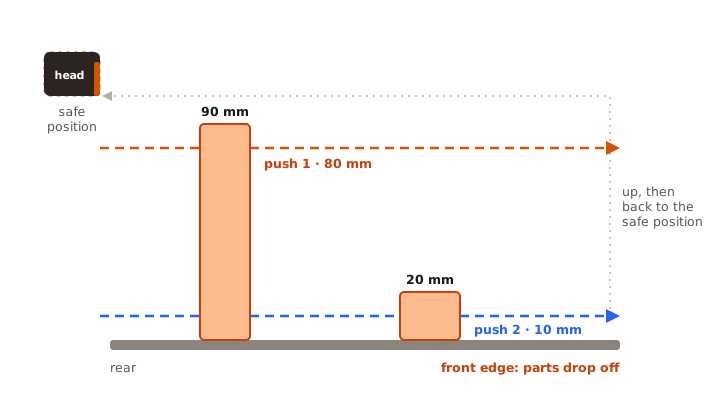
- Every stage starts from the safe position, where the head waits during the cooldown. Before each push or clearing the head goes up to the printer’s top sweep height, travels to the safe position and only then comes down to the stage’s height. A lower push never drives into a part that a higher push left standing.
- Every pass starts at the rear edge and pushes forward. The head steps across to the next lane at the rear, never along the front edge where the parts drop off.
- After the last stage the head goes up and back to the safe position once more.
- A1 and A1 mini: the safe position is beside the bed, so the head travels at full height to the lane’s rear corner and comes down there.
Preview and time in the app
Section titled “Preview and time in the app”Once the control is on, the app draws the routine over your plate:
- Plate, top down: the lanes of every stage over the area your parts cover. Each push has its own colour (push 1 orange, push 2 blue), clearings are grey and dashed.
- Height: each push height next to the tallest part on the plate.
- Time: an estimate for the whole routine, and the difference to the standard one, for example
+12s vs standard.
Example: one tall part and short parts on the same plate
Section titled “Example: one tall part and short parts on the same plate”A P1S plate with one 90 mm part and four 20 mm parts. The standard push at 80 mm leaves the short parts on the plate.
-
Switch on Custom sweep control and set the push to Whole plate. Leave its height blank: the file’s push height is 80 mm.
-
Click Add push. The new push starts at 40 mm. Set it to
10 mm. -
Set both clearings to
10 mmtoo. Left blank, they run at the file’s push height and pass over the short parts. -
Check the preview and watch the first loop.
Limits per printer
Section titled “Limits per printer”| Printer | Whole plate | One position, X range | Middle of the plate | Height limit |
|---|---|---|---|---|
| Bambu Lab P1P, P1S, P2S, X1C, X1E | 7 lanes | 30 to 220 mm | X 125 | 235 mm |
| Bambu Lab X2D | 7 lanes | 30 to 220 mm | X 125 | 240 mm |
| Bambu Lab H2S | 10 lanes | 30 to 320 mm | X 160 | 335 mm |
| Bambu Lab H2D, H2C | 10 lanes | 30 to 300 mm | X 150 | 325 mm |
| Bambu Lab A1 (push mode) | 7 lanes | 0 to 250 mm | X 125 | 250 mm |
| Bambu Lab A1 mini (push mode) | 6 lanes | 0 to 180 mm | X 90 | 180 mm |
| Elegoo Centauri Carbon, Centauri Carbon 2 | 7 lanes | 30 to 220 mm | X 125 | 235 mm |
| Prusa Core One | 7 lanes | 30 to 242 mm | X 125 | 235 mm |
| Prusa XL, XL+ | 11 lanes | 30 to 330 mm | X 180 | 355 mm |
| Snapmaker U1 | 8 lanes | 30 to 250 mm | X 125 | 235 mm |
| Flashforge AD5X | 7 lanes | 30 to 220 mm | X 110 | 220 mm |
The height limit is the highest a sweep can run on that printer. It is also the height the head travels at between stages.
Over the Processing API
Section titled “Over the Processing API”Business accounts can send the same routine with a request: sweepRoutine, with up to 10 pushes and 5 clearings. See Processing API: extra tuning tools.